Configuring Parameters in the Connect Distributor Portal
To ensure the connector functions correctly, all configuration parameters must be filled in with accurate values. Follow the steps below to populate these parameters properly:
- Log in to the CloudBlue Connect Distributor Portal.
- Click Products in the main menu at the top of the page and then select the AWS Consolidated product.
- Click Configuration and go to the Values tab.
- Filter the list to find the values in the table below and assign the proper value to each parameter.
In the table below you can see a description of the parameters.
| Parameter ID | Description |
|---|---|
| provisionServiceControlPolicies |
Policy IDs which can be obtained by following the instructions provided in the Setting up Your AWS Organization section. This value must be a string of comma-separated IDs of the AWS Service Control Policies. Note: Please bear in mind that this feature will be available only for AWS Organizations with All Features enabled, as described in the Setting up Your AWS Organization section. |
| awsApiMasterKey | Provide the AWS Master API key that will be used in a production environment. You can obtain it by following the instructions provided in the Setting up Your AWS Organization section. |
| awsApiMasterKey_TEST | Provide the AWS Master API key that will be used in a test environment. You can obtain it by following the instructions provided in the Setting up Your AWS Organization section. |
| awsApiMasterSecret |
This value is the AWS API Master Secret to be used in a production environment. You can obtain it by following the instructions provided in the Setting up Your AWS Organization section. The AWS API Master secret must be encrypted by using the following public key: Copy
Note: The public key alone cannot be used to decrypt the secret. Please note that the version of the public key is "key_v2". This version has to be used when copying the value of the encrypted secret in the Connect configuration parameter, as described below. Use the following command to encrypt the AWS API Master secret with the provided public key: TOKEN_PLAIN_TEXT='XXXXXXX' echo -n $TOKEN_PLAIN_TEXT | openssl pkeyutl -encrypt -pubin -inkey pbkey.pem | base64
The resulting value is a base64 string that you must use along with the private/public key pair version to construct a string with the following format: For example:
Important: Finally, use the resulting string to configure the |
| awsApiMasterSecret_TEST |
This value is the AWS API Master Secret to be used in a test environment, which can be obtained by following the instructions provided in the Setting up Your AWS Organization section. The AWS API Master secret must be encrypted by using the following public key: Copy
Note: The public key alone cannot be used to decrypt the secret. Please note that the version of the public key is "key_v2". This version has to be used when copying the value of the encrypted secret in the Connect configuration parameter as described below. Use the following command to encrypt the AWS API Master secret with the provided public key: TOKEN_PLAIN_TEXT='XXXXXXX' echo -n $TOKEN_PLAIN_TEXT | openssl pkeyutl -encrypt -pubin -inkey pbkey.pem | base64
The resulting value is a base64 string which you must use along with the private/public key pair version to construct a string with the following format: For example:
Important: Finally, use the resulting string to configure the |
| awsMasterPayerId | Provide the AWS Marketplace Master Payer ID to be used in a production environment. You can obtain it by following the instructions provided in the Setting up Your AWS Organization section. The master Payer ID is the AWS account ID for the provider AWS account. |
| awsMasterPayerId_TEST | Provide the AWS Marketplace Master Payer ID to be used in a test environment. You can obtain it by following the instructions provided in the Setting up Your AWS Organization section. |
| awsAthenaCurName |
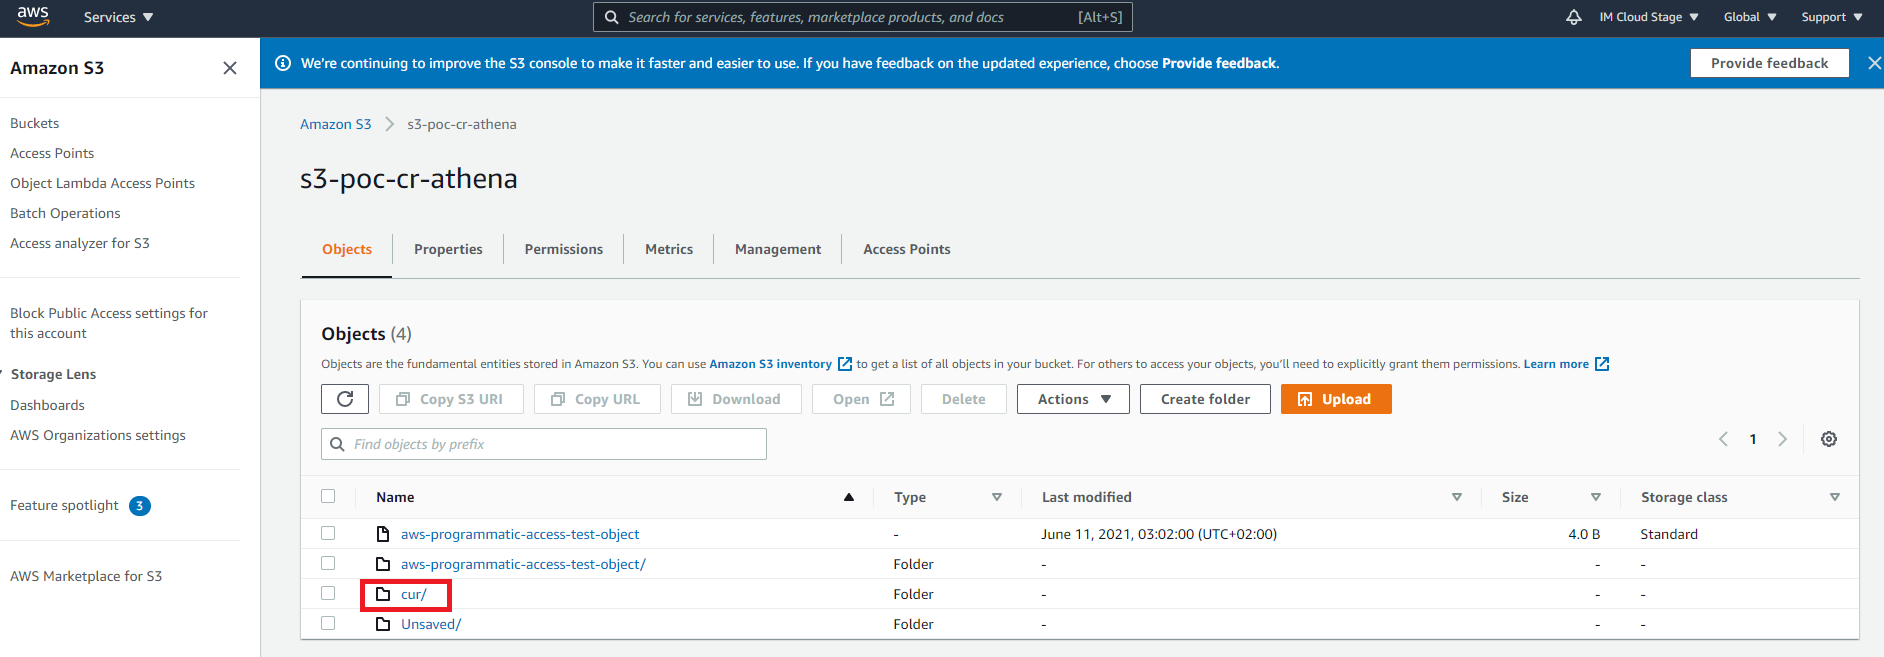
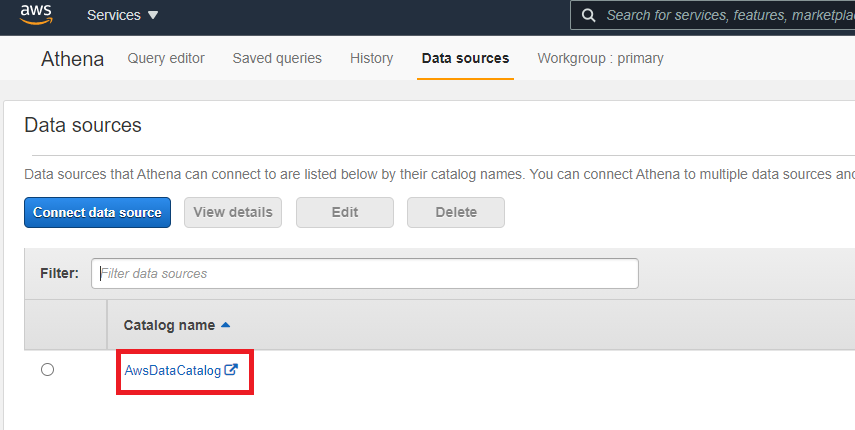
Note: Before configuring this parameter, it is necessary to follow the instructions provided in the Setting up Athena and Creating Cost Usage Reports in AWS section. This parameter will be used in a production environment and allows you to specify the name of the Athena CUR (Cost and Usage Report). To configure this parameter, log in to the AWS Management Console and follow these steps:
|
| awsAthenaCurName_TEST |
Note: Before configuring this parameter, it is necessary to follow the instructions provided in the Setting up Athena and Creating Cost Usage Reports in AWS section. This parameter will be used in a test environment and allows you to specify the name of the Athena CUR (Cost and Usage Report). To configure this parameter, follow the steps specified in the |
| awsS3Bucket |
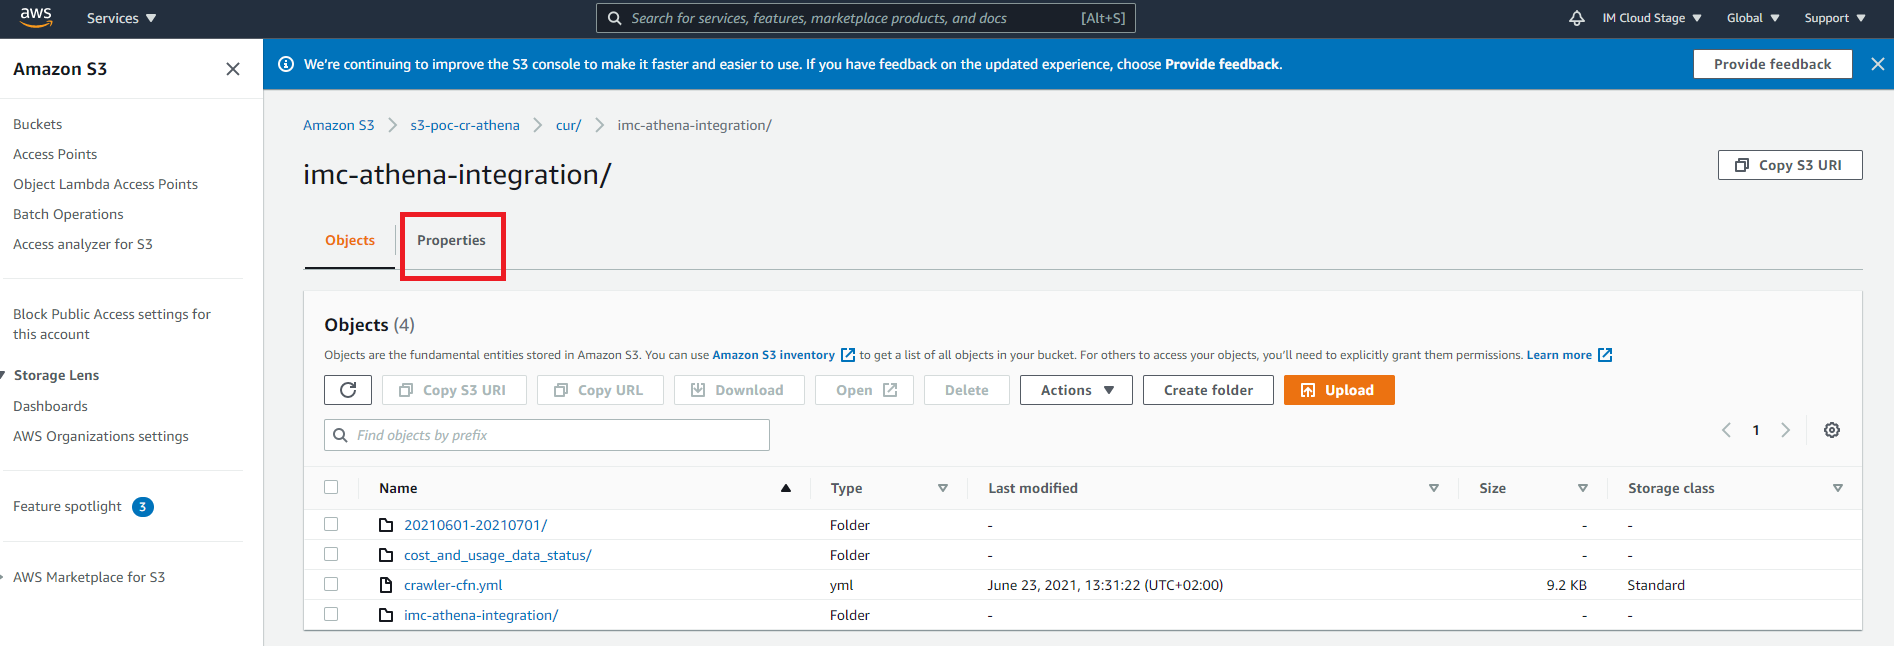
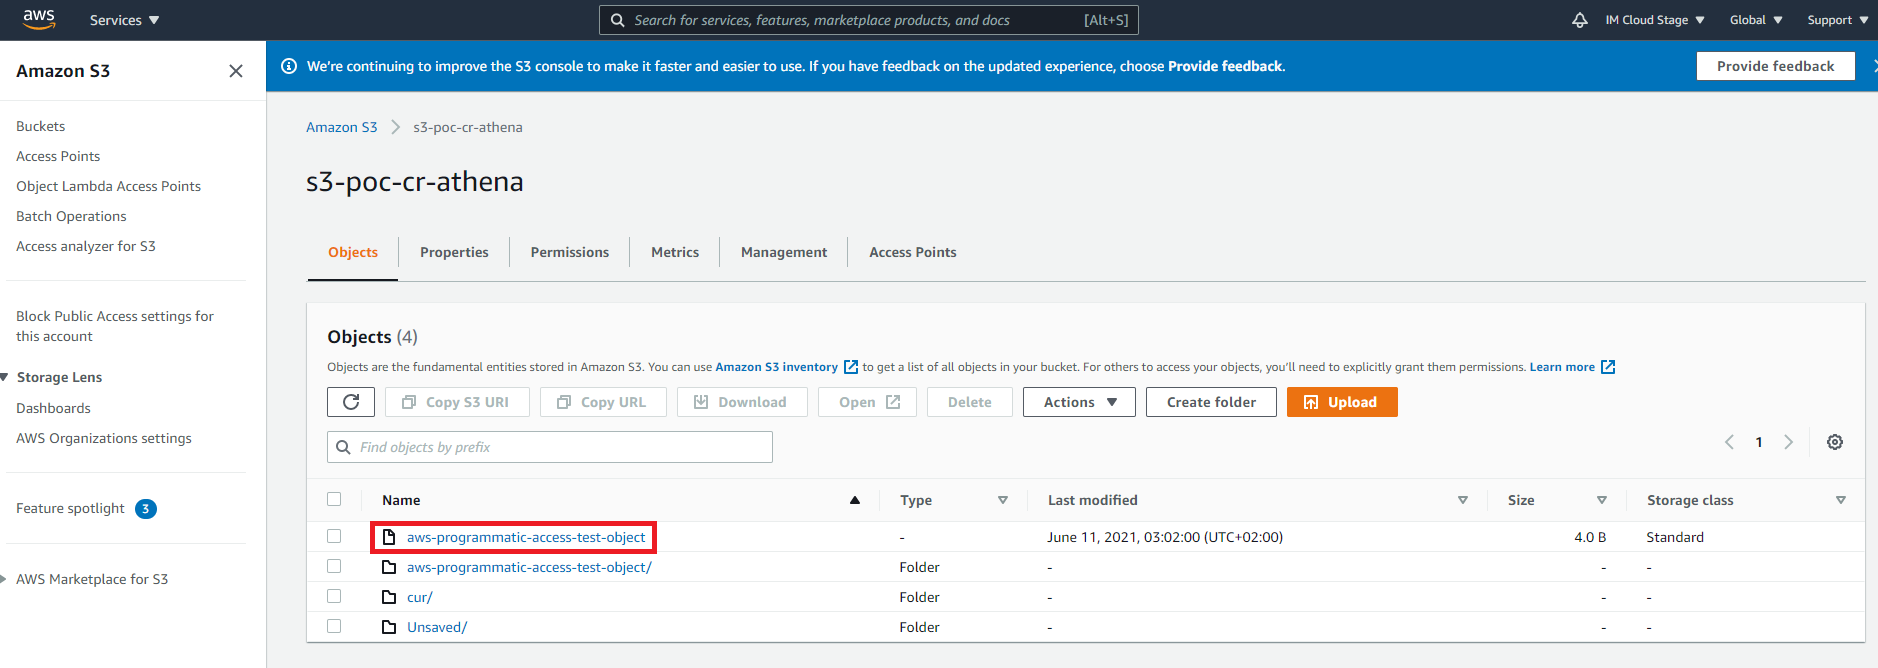
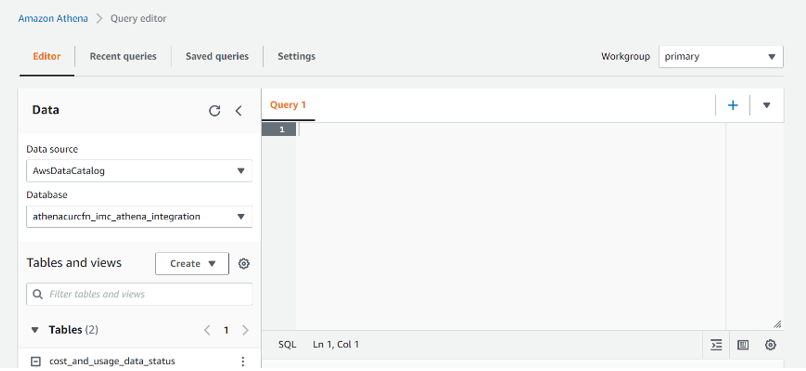
Note: Before configuring this parameter, it is necessary to follow the instructions provided in the Setting up Athena and Creating Cost Usage Reports in AWS section. This parameter will be used in a production environment and allows you to specify the S3 URI. To configure this parameter, log in to the AWS Management Console and follow these steps:
|
| awsS3Bucket_TEST |
Note: Before configuring this parameter, it is necessary to follow the instructions provided in the Setting up Athena and Creating Cost Usage Reports in AWS section. This parameter will be used in a test environment and allows you to specify the S3 URI. To configure this parameter, follow the steps provided in the |
| awsAthenaDatabaseName |
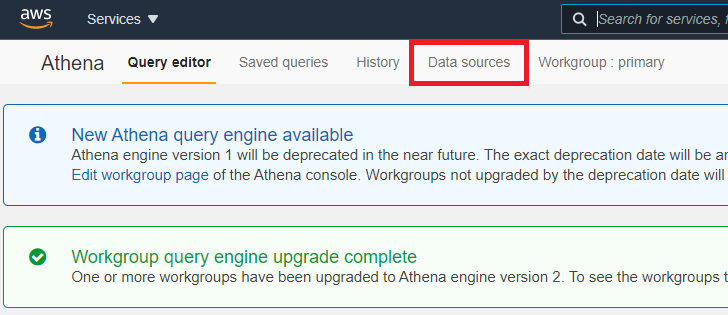
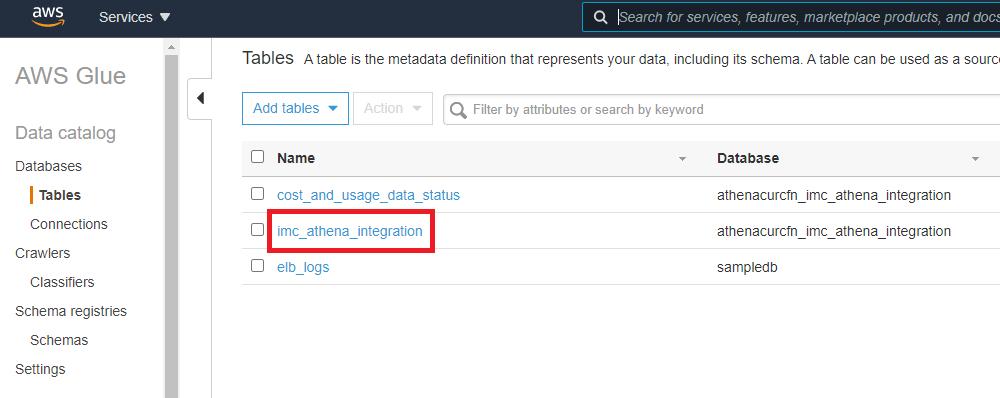
Note: Before configuring this parameter, it is necessary to follow the instructions provided in the Setting up Athena and Creating Cost Usage Reports in AWS section. This parameter will be used in a production environment and allows you to specify the Athena database name. To configure this parameter, log in to the AWS Management Console and follow these steps:
|
| awsAthenaDatabaseName_TEST |
Note: Before configuring this parameter, it is necessary to follow the instructions provided in the Setting up Athena and Creating Cost Usage Reports in AWS section. This parameter will be used in a test environment and allows you to specify the Athena database name. To configure this parameter, follow the steps provided in theawsAthenaDatabaseName parameter description.
|
| awsAthenaTableName |
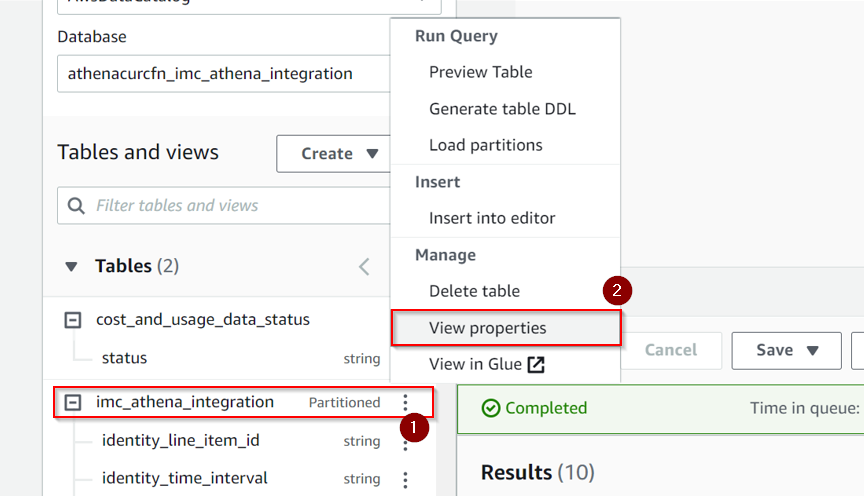
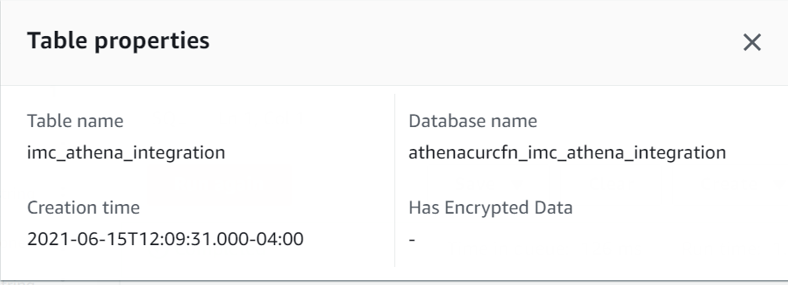
Note: Before configuring this parameter, it is necessary to follow the instructions provided in the Setting up Athena and Creating Cost Usage Reports in AWS section. This parameter must be used in a production environment and allows you to specify the Athena database table name. To configure this parameter, log in to the AWS Management Console and follow these steps:
|
| awsAthenaTableName_TEST |
Note: Before configuring this parameter, it is necessary to follow the instructions provided in the Setting up Athena and Creating Cost Usage Reports in AWS section. This parameter will be used in a test environment and allows you to specify the Athena database table name. To configure this parameter, follow the steps provided in theawsAthenaTableName parameter description.
|
| awsAthenaRegion |
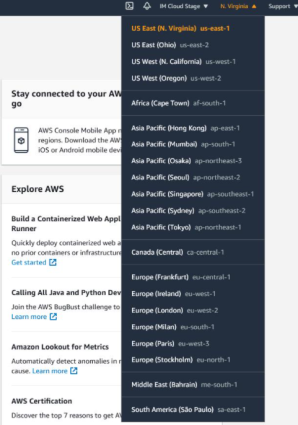
Note: Before configuring this parameter, it is necessary to follow the instructions provided in the Setting up Athena and Creating Cost Usage Reports in AWS section This parameter must be used in a production environment and allows you to specify the Athena region. You can find the corresponding Athena region in the AWS Management Console, but the default value will be "us-east-1":
|
| awsAthenaRegion_TEST |
Note: Before configuring this parameter, it is necessary to follow the instructions provided in the Setting up Athena and Creating Cost Usage Reports in AWS section. This parameter must be used in a test environment and allows you to specify Athena region. You can find the corresponding Athena region in the AWS Management Console, but the default value will be "us-east-1":
|
| fxRate | Exchange rate to convert USD to the currency of a specific marketplace (USD to local tender). For example: 0.72 |
| customMarkup |
This parameter allows you to specify the markup multiplier that will be applied to all the services except for Marketplace services. For example: if the original price is 10 and you apply a 1.2 markup multiplier, the final price will be 12. |
| customMarkupMarketplace | This parameter allows you to specify the markup multiplier that will be only applied to the Marketplace services. For example: if the original price is 10 and you apply a 1.2 markup multiplier, the final price will be 12. |
| organizationalUnitEnabled | This parameter allows you to specify if customer accounts will be created under a specific organizational unit. If this is the case, set this marketplace configuration parameter to Yes. For further information, refer to the FAQs section. |
| organizationalUnitId | This parameter allows you to specify the ID of the Organizational Unit under which customer accounts will be created. For further information, refer to the FAQ section. |
| catchAllDomain | It allows you to provide the domain that will be used in a production environment to generate the email addresses for the new AWS accounts. |
| catchAllDomain_TEST | It allows you to provide the domain that will be used in a test environment to generate the email addresses for the new AWS accounts. |
| activationTemplateId | Configure this parameter with the following activation template ID: TL-312-367-194 |
| importActivationTemplateId | Configure this parameter with the following activation template ID: TL-403-813-629 |
| transferActivationTemplateId | Configure this parameter with the following activation template ID: TL-660-410-680 |
| newActivationTemplateId | Configure this parameter with the following activation template ID: TL-498-925-893 |
| marketplaceCurrency | Select the corresponding ISO 4217 code for the marketplace currency. |
| roundingMode | This parameter is used to round the cost reported for customers from 10 to 2 digits. The rounding method selected in the drop-down menu will depend on the financial regulations for each country. The default and recommended value is ROUND_HALF_UP |
| awsAccountModel | It allows you to select the default account model for your customers: Solution Provider Account Model (SPAM) or End Customer Account Model (ECAM). The Service Provider Account Model is the default model. When the ECAM model is selected, the AWS Account Email will be requested in the ordering process. Customers must then provide an email of their domain, which will be used to create the root user on the AWS account. |
| newECAMActivationTemplateId | ID of the activation template for End Customer Account Model (ECAM) orders, which should include information on how to access the root user. Configure this parameter with the following activation template ID: TL-630-454-048 |
| provideRootUserForECAM | If this parameter is set to No, the default activation template will be used for End Customer Account Model (ECAM) orders, which means that no instructions will be provided on how to access the root user. |
| enableMultiplePayer |
This parameter allows you to enable or disable the ability to transact with multiple consolidated payer accounts in a particular marketplace. If this parameter is set to No, the processor will use the configuration defined in the marketplace configuration parameters. However, if Yes is selected, resellers will be able to set a different configuration for each customer through a Tier Configuration Request. This can be done by clicking the Requires Attention button that is available in the Reseller Authorization tile in the UX1 panel for the reseller. Note: If the Multiple Payer field in the TCR is set to No, the request will be auto-approved and the configuration defined in the marketplace configuration parameters will be used instead. |
| cancelationGracePeriod | Number of days from the manual cancellation of a subscription in AWS until the approval of the cancellation order in Connect. For example: "60". |
| processor_approve_list |
This parameter allows you to configure a list of asset Ids, order IDs or customer IDs for which a subscription cancellation or suspension request will be auto-approved offline. The IDs must be separated by commas, as follows: "AS-1111-1111-1111,PR-1111-1111-1111-001,TA-1111-1111-1111" |
Note: Modifying the values of the TCR parameters once the asset request is approved will have an impact on usage.


